
Design Process:
Interactive Single Page Website (HTML, CSS, JavaScript)
Creator:
Mac Mitchell
at
Arizona State University
Graphic Information Technology Full Stack Web Development
Project Features:
Dark Mode
Interactive Product Display
Interactive Search Bar
Cart/Cost Calculator
Guessing Game
Input Validating Contact Form
Project Requirements
- The site will be a single page that displays properly styled at 1280px wide (fixed).
- The page should look like a real, stand-alone website.
- Users should see all of the kind of content that they would expect from any professional website.
- No placeholder text is allowed, text and photos should be realistic and high-quality, and everything you'd expect to see should be present (header, navigation (even within the page), footer, etc.
- Include a control and the proper functionality to allow the user to choose whether to display your site in light mode or dark mode
- A contact form.
- ALL of your files, including any JS, HTML or CSS should be well organized, properly indented, well-commented, and appropriate (in terms of content and layout).
- Your HTML and CSS should validate without errors or warnings.
- When viewing your site in the browser, no errors should be visible in the console.
- Add the async or defer attribute to your script tag in the header to prevent errors on page load with the JS.
- Your JS should "use strict"; globally
Product Display - This would be a section of your page that allows the user to view some of the available products or services this company offers one at a time, by clicking on a control that includes the product name. Each "product" must include a name, image, and short description (at least a sentence or two) that is displayed when chosen. One product will display by default on page load, and only one product should ever display on screen at a time.
Game Play - This section will most likely make sense as a sort of "contest" for the user. There will be an input where the user enters a number between 1 and 10. You will generate a random number that you display to the screen (with that the user guessed), and either declare them a winner (their guess matches the random number) or ask them to try again (their guess does not match the random number). You don't have to actually do anything when they "win" except say that they won.
Cost Calculator - This would be a section of your page that displays a collection of top products, probably for "quick order" or something similar. Each product would include an image, price and name, and some control that the user can click on to add that product to their total. The total/tax/shipping will display in the "total" area of the section, and the total cost should display the current product total, tax and/or shipping, and total price with tax on change (every time the control for a product is clicked, the total should update). Include a button allowing the user to "check out" that when clicked will clear the cart, display the total cost of the items that were in the cart, and thank the user for their order. If the cart is empty when the user. clicks to check out, they should see a message asking them to add something to the cart before they check out.
Design Process
Brainstorming
To start, I began brainstorming about what kind of website I wanted to build. An online store seemed like a great choice to meet all of the project requirements. As a lover of music, I knew I wanted to create an online vinyl record store.
I began to sketch out ideas and possible wireframes for how I wanted the site to look with the functionality in mind. My initial wireframe (pictured below) served as the template for how I would begin to build my website.
From there, I began to gather assets, color schemes, fonts, and images that I believe would work well to create a clean, modern and inviting looking page. Once I was satisfied with the assets, I had assembled it was time to begin laying the foundation of the website: HTML.
HTML
Organizationally, the body of the page would consist of 6 elements: a header, an about section, a shop, the guessing game, a contact form and a footer. I began structuring my HTML to incorporate these 6 elements. I used ID's on sections to allow the CSS to target and manipulate them.
Once I had the broad skeleton of my website's content, I jumped over to CSS. During this process I discovered that starting at the top, going section by section coding the HTML and CSS simultaneously was my most productive workflow. This way I am able to see how the page is shaping up as I work on it.
CSS
After the CSS Reset, I imported my fonts: I went with "Montserrat Alternatives" for significant items and "Ubuntu" for the body text.
I used a combination of flexbox, grid containers, variables and pseudo classes to create the desired layout. Since the project requirements stated a fixed 1280px width, I did not use media queries to make the page responsive at different viewport sizes.
As the size of my HTML and CSS files grew, I made sure to save and validate them often to prevent unforeseen bugs.
Once the HTML and CSS was finished, I began to add the interactive functionality to the website using JavaScript. I started by creating global variables for all elements that I knew I would need to access/update/style.
JavaScript
My first task was creating the dark mode toggle switch. I imported the toggle button images from Google's Material Icon repository which proved to be very helpful throughout the process. I added an event listener to button that triggered a function to update CSS properties using the. style method.
The 'Display Product' functionality works by adding or removing the .hiddenItem class to whichever display item was chosen.
I used form validation and regular expressions to validate user entry in the contact form before submission and throw error messages if incomplete.
The most challenging portion of the project was creating the cart feature that would allow users to add items to their "cart" and update the cart totals in real time. I used an array to represent the user's cart. My first idea was to write conditionals for each item that would update to the cart, but I realized this idea is not easily scalable. In the end, I learned I could access HTML attributes and create objects with their own individual properties that can be passed to the cart array.
Conclusion
If I had more time with this project, I would continue to tweak the aesthetics of the website to look sleeker and more professional. I would also add a database of sorted products for users to filter and search. I learned a great deal about object-oriented programming and creating interactive websites. Overall, I'm happy with the result and will likely end up using these design elements for my own future business endeavors.
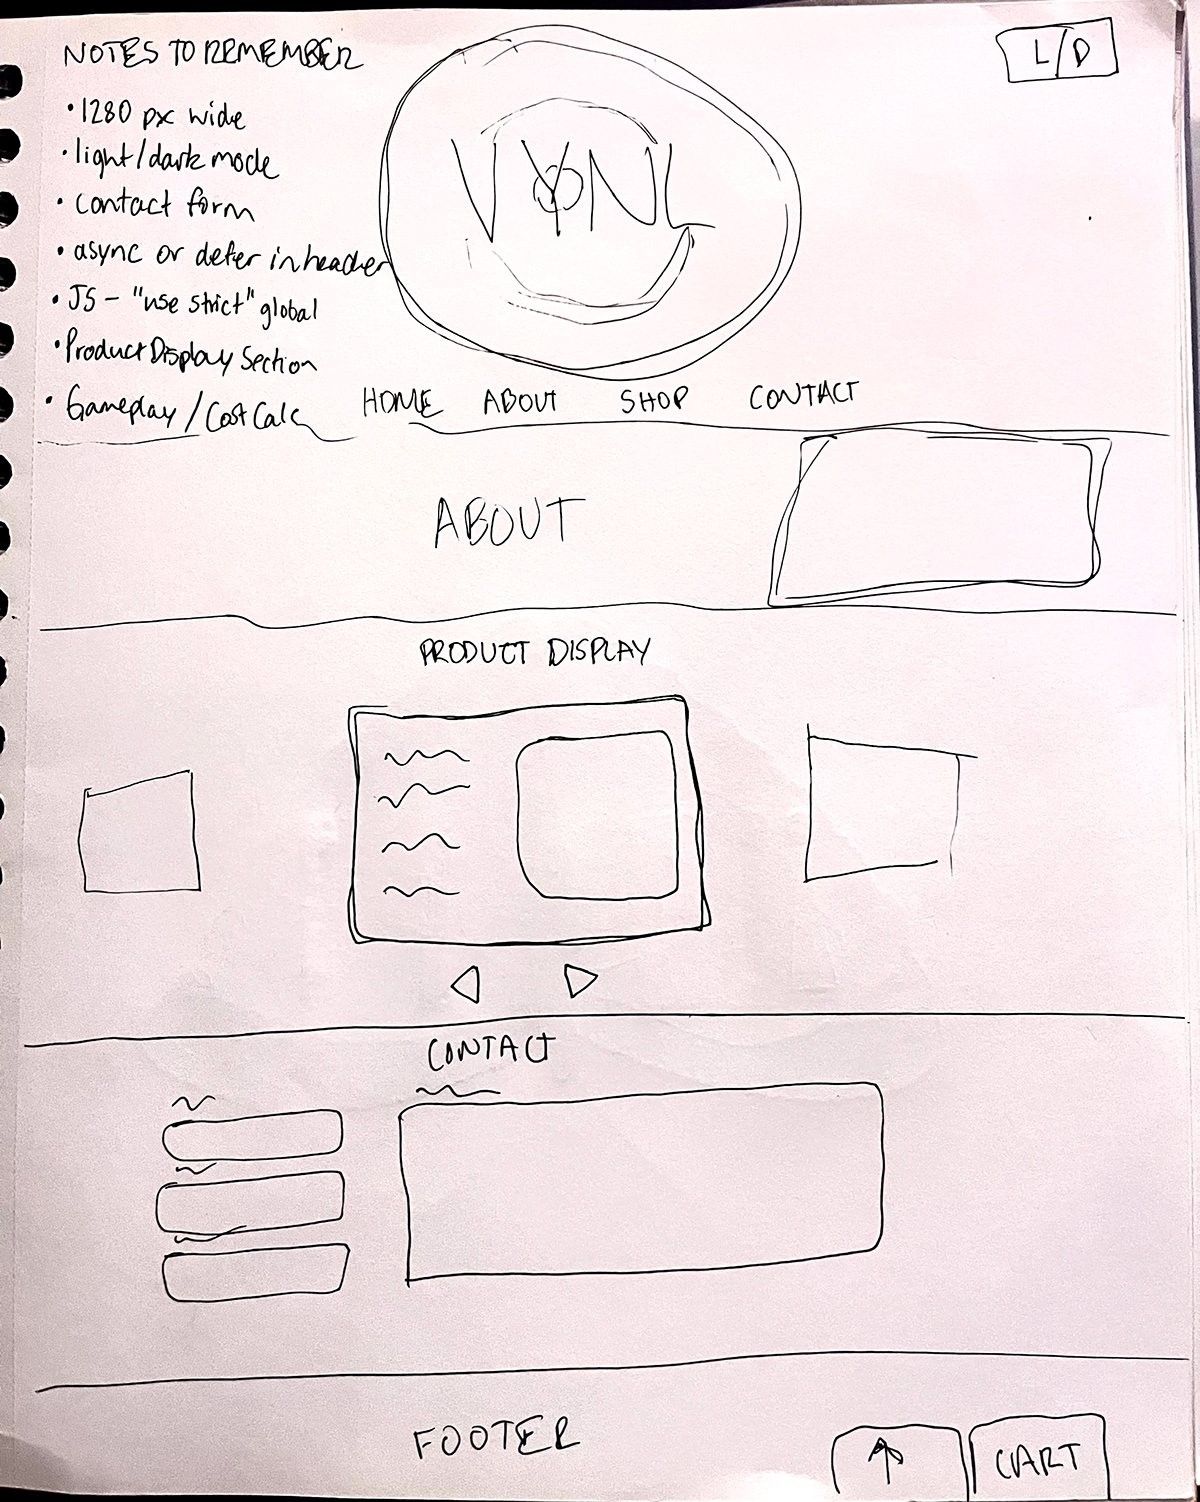
Initial wireframe mockup


My logo design created in Adobe Illustrator
source: https://openclipart.org/detail/7645/vinyl-records

image source: https://secretseattle.co/seattle-record-stores/


icon source: Google Material Icons & Fonts


light mode/dark mode page layout

